Get in Touch with Masstech

Process and quality guide · Updated September 2026
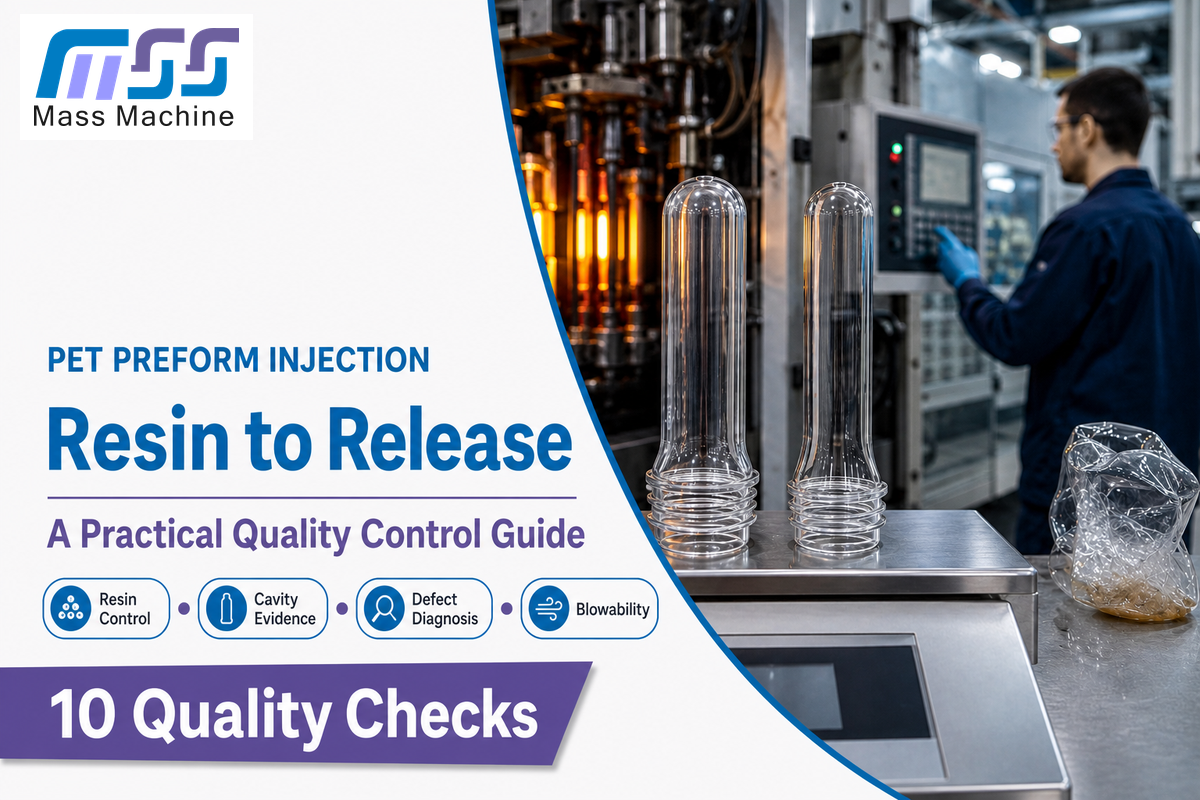
Ten quality-control checks for turning resin, molding, cavity, inspection, and bottle-trial evidence into a defensible release decision.
In short: PET preform injection should be controlled as a resin-to-release chain. Confirm what the product specification requires, prove the resin condition, read the molding cycle as linked stages, separate cavity-local from time-dependent variation, and connect accepted preforms to a controlled bottle trial. Good appearance is evidence, but it is not the whole release case.
PET preform injection is the injection-molding process that turns conditioned polyethylene terephthalate into a thick-walled intermediate for reheating and stretch blowing. It is also described as PET preform injection molding, PET injection molding, preform molding, or, in UK usage, injection moulding. Yet a PET bottle preform isn’t a finished container. That line is easily blurred. Injection teams may concentrate on cycle stability while bottle teams watch heating and stretch behavior, but both work with the same material and product history. For PET preform manufacturing, the real solution is an evidence trail from resin lot to finished container.
This article has a different focus from Mass Technology’s equipment and configuration page for pet preform injection. That page handles models, tonnage, cavity counts, output, commercial benchmarks, pricing, calculators, quotations, and requests for quotation (RFQs). This article manages the process limits, defect evidence, inspection, and traceability and the injection-to-blowing interface. Separating those roles clarifies the purpose of each page.
Scope: the checklists and named assets below are editorial decision aids, not machine manuals, validated plant procedures, universal process windows, legal opinions, or product specifications. The grade of resin, approved drawings, equipment, qualified personnel, test methods, intended use, local needs, and statutory and regulatory requirements determine a legitimate release decision.
1–2 · Define
Process boundary and release specification
Process boundary and release specification
3–4 · Condition
Resin evidence and coupled cycle
Resin evidence and coupled cycle
5–7 · Diagnose
Cavity patterns, defects, and controlled trials
Cavity patterns, defects, and controlled trials
8–10 · Release
Inspection, blowability, and long-run control
Inspection, blowability, and long-run control
1. Define the PET Preform Injection Process Boundary
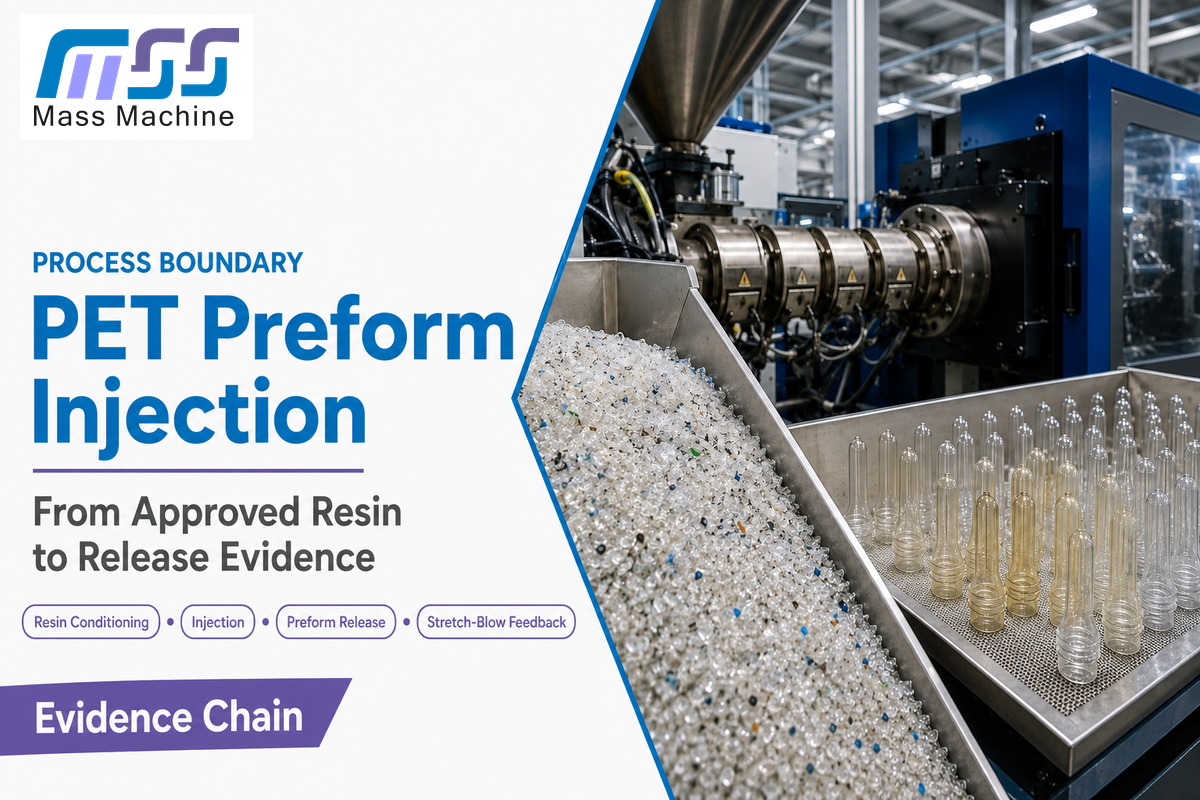
Direct answer: the injection boundary runs from approved PET material identity and conditioning through plasticizing, mold filling, packing, cooling, ejection, post-mold handling, inspection, and preform disposition. Reheating, stretching, and blowing occur in the next process, but their outcomes should feed back into the preform’s history.
On a PET preform injection molding machine, the injection unit, mold, clamp, auxiliaries, and handling equipment form one evidence-producing molding system. This guide doesn’t prescribe injection-machine size or clamping force; those are equipment-selection variables for the approved mold and process duty. Here, the pertinent question is whether the real injection molding machines, tooling, and plastic machinery recorded the conditions needed to define a quality event.
One published patent for pet preform cooling shows injection, holding, in-mold cooling, ejection, transfer, and post-transfer cooling as interlinked steps. It’s helpful for sequencing steps, but doesn’t mean that every plant uses the equipment described.
| Boundary point | Evidence that should cross it | What it does not prove |
|---|---|---|
| Resin receipt to dryer | Grade, lot, packaging condition, exposure history | Condition at the feed throat |
| Dryer to injection unit | Dryer status, residence, transfer path, approved test result | Melt history after entry |
| Mold to handling | Shot time, cavity, alarms, cooling and ejection observations | Final dimensions after stabilization |
| Inspection to storage | Sample identity, method, result, limit, disposition | Bottle performance under every blow condition |
| Preform to blow molder | Lot/cavity sample, storage history, trial reference, bottle outcome | Food-contact or market compliance by itself |
Once the concern shifts from process understanding to machine size, mold cavitation, output, or project assessment, use the commercial pet preform injection page. Including these issues in this guide would require two pages to answer the same procurement question.
2. Freeze the Release Specification Before Chasing Settings
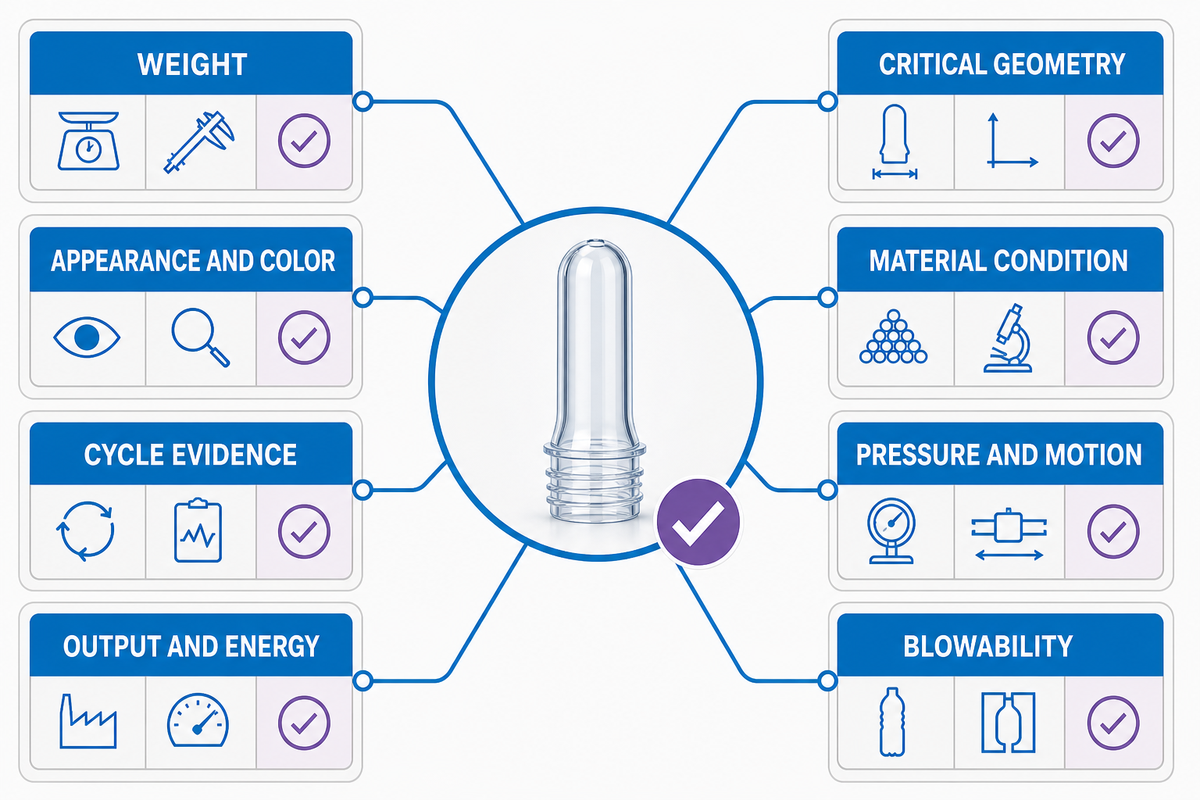
Direct answer: before changing the process, define what an acceptable preform is. Each characteristic must have a controlled source, method, unit of measure, identity of sample, limit, disposition rule, and owner. Otherwise, “better” can mean clearer to one person, lighter to another, and easier to blow to a third.
Editorial Asset: 8-Category Preform Release Envelope
This envelope can be used to expose missing decisions; it isn’t a standard and has no universal limit. The numbers below illustrate record formats, display resolution, or review periods. Don’t interpret these as recommended process targets.
| Characteristic category | Controlled source | Illustrative record format | Identity | Disposition |
|---|---|---|---|---|
| Weight | Approved drawing/specification revision | 0.01 g or 0.1 g resolution; batch mass in 1 kg increments | Lot, shot/time, cavity | Accept, hold, sort, investigate |
| Critical geometry | Drawing plus downstream interface | 0.01 mm or 0.1 mm resolution; named fixture and method | Cavity and sample time | Owner and escalation path |
| Appearance and color | Product and customer requirement | Lighting/reference ID; review at 30 min and 8 hr where the plan requires | Lot, cavity, retained sample | Defined defect class and response |
| Material condition | Resin/product control plan | 0.1 °C display resolution, 1 hr exposure increment, result in 1 ppm where specified | Resin and preform lot | Qualified reviewer decision |
| Cycle evidence | Qualified process record | 0.01 s or 0.1 s resolution; alarm duration in 1 min intervals | Machine, mold, shot/time | Review change and affected scope |
| Pressure and motion | Equipment record and approved method | 0.1 bar, 0.01 MPa, or 1 rpm display resolution as applicable | Machine, unit, timestamp | Compare only like-for-like records |
| Output and energy | Production and utility record | 1 kg/h or 1 t/h output; 0.1 kW demand and 1 kWh use over 1 hr | Line, product, good/reject counts | Report accepted output separately |
| Blowability | Bottle/trial protocol | 1% reporting increment, 60 s trial window, 1 day or 30 days of linked retention where required | Linked preform samples | Release for the defined use only |
Keep the displayed precision with the result: a 0.01 g reading, a 0.01 mm dimension, a 0.1 °C temperature, a 0.1 bar pressure, and a 0.1 kW demand aren’t interchangeable with values rounded to 1 g or 1 mm. Precision still doesn’t equal accuracy; the approved method and instrument status decide whether the result is usable.
Intrinsic viscosity is a useful example of why method identity matters. ASTM D4603-26 covers a glass-capillary IV method for soluble PET under stated test conditions. It is not a moisture test, and the standard’s scope does not create one universal IV acceptance window for every resin and bottle.
Food-contact boundary: passing this envelope does not establish food-contact suitability. For recycled plastics in US food packaging, the FDA discusses source, recycling process, purity, decontamination evidence, and proposed conditions of use as separate considerations. Other markets have their own requirements.
3. Control Resin Condition from Storage to the Feed Throat
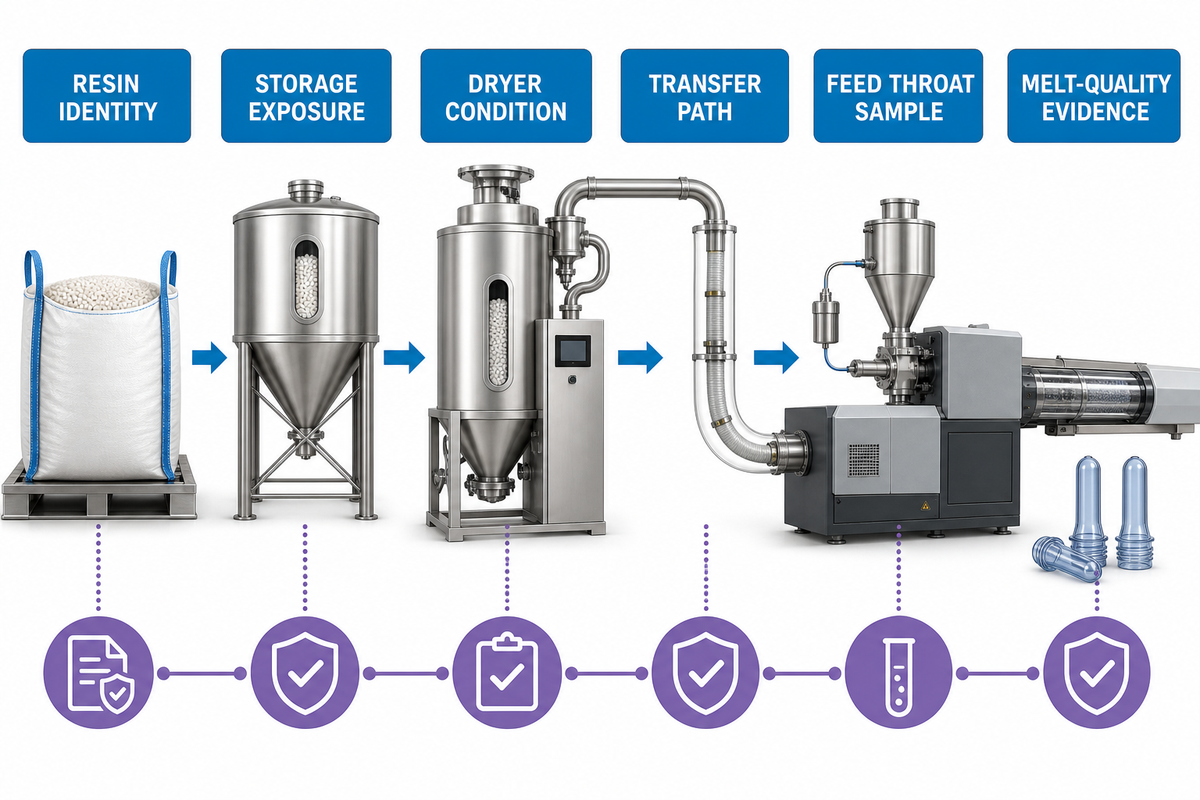
Direct answer: consider drying as an evidence chain, not a simple copied temperature-and-time pair. The question is whether the approved resin reached the injection unit in the qualified condition, following its actual storage, exposure, dryer residence time, and transfer history. When moisture content is a release variable, document the sampling point, method, units–citing ppm only if the controlled method uses it–and the resin-specific limit rather than importing a generic number.
Because PET can undergo hydrolytic degradation when moisture remains at melt-processing temperature, moisture control has to be verified rather than inferred from a dryer setting. One peer-reviewed study on virgin and recycled PET also reports that drying methods may vary and that processing history can produce changes that resemble material changes. The laboratory drying condition is within the study context and isn’t a shop-floor recipe.
1 · Identify
Grade, resin lot, recycled-content route, additive/color batch
Grade, resin lot, recycled-content route, additive/color batch
2 · Expose
Packaging status, open time, storage and transfer events
Packaging status, open time, storage and transfer events
3 · Condition
Dryer identity, readiness, loading, residence and alarms
Dryer identity, readiness, loading, residence and alarms
4 · Verify
Approved method, sample point/time, result and units
Approved method, sample point/time, result and units
5 · Disposition
Release, recondition, hold, investigate, or reject
Release, recondition, hold, investigate, or reject
This Resin-to-Melt Evidence Chain changes the troubleshooting question. Rather than asking, “Was the dryer set correctly?,” we would now ask, “Which material entered, what happened to it, where was it sampled, how was it measured, and which instruction defined acceptance?” Without residence, airflow/dew-point evidence, sample handling, and transfer history, the evidence is incomplete.
For rPET, two opposing shortcuts should be avoided. “Recycled material caused it” isn’t an answer, nor is “feedstock source never matters.” A peer-reviewed bottle-to-bottle review reports that feedstock composition, contamination, reheat additives, infrared response, and batch variability can affect later stretching, and those factors still need measurement and a controlled comparison.
4. Read the Injection Cycle as Coupled Stages
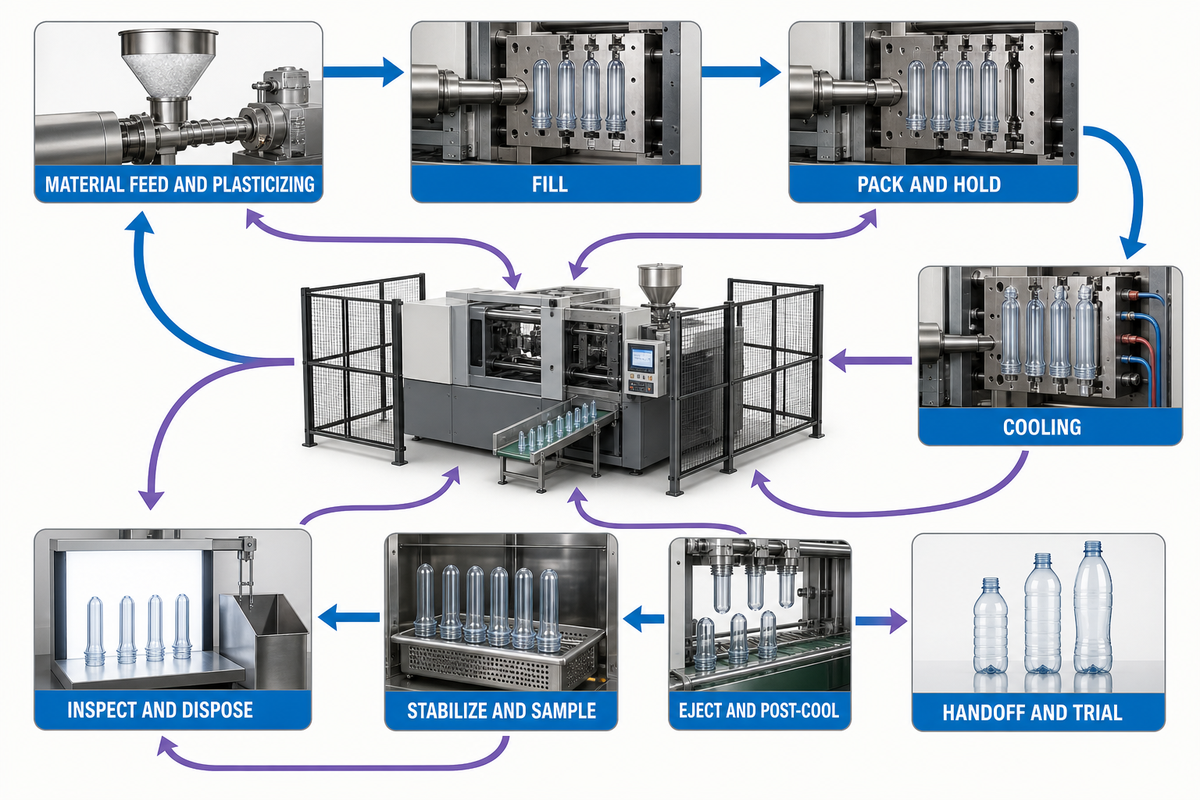
Direct answer: plasticizing, filling, packing, cooling-system performance, ejection, and handling are all interrelated. Evidence for a defect may not be apparent until after ejection; however, it may originate in material preparation, melt history, shear exposure, filling balance, pressure transfer, cooling-water performance, heat removal, or handling.
A 2025 PET preform study varied cooling time, cycle time, melting temperature, injection time, and mold temperature while measuring weight and warpage. The reported percentage changes belong to that experiment and shouldn’t be copied into other processes. The important lesson is that several factors and measured responses were studied in combination.
| Stage | Purpose | Record | Later signal to compare |
|---|---|---|---|
| Material feed/plasticizing | Prepare a repeatable melt | Lot, dryer/transfer status, melt-history indicators, alarms | Color, haze, specks, material-property change |
| Fill | Distribute melt to cavities | Fill profile, transfer event, cavity pattern | Short fill, weight spread, localized appearance |
| Pack/hold | Compensate shrinkage before gate freeze | Pressure/time profile and repeatability | Weight, sink, gate and dimensional response |
| Cooling | Remove heat while holding geometry | Circuit condition, temperatures, time, interruptions | Haze/crystallinity clues, warpage, post-mold growth |
| Eject/post-cool | Release and stabilize the preform | Ejection, robot/handling, contact, retained heat | Scuff, deformation, gate/neck changes |
| Stabilize/sample | Preserve a comparable part condition | Conditioning time, cavity, shot/time, retained sample | Dimensional drift, appearance change, sample mismatch |
| Inspect/dispose | Compare evidence with the controlled release source | Method, result, limit, deviation, owner | Accept, hold, sort, investigate, or reject |
| Handoff/trial | Connect the preform release to bottle performance | Linked sample, storage, heating reference, bottle result | Stretch or bottle failure tied to the source preform |
The map was designed to avoid a common mistake of changing the last visible step first. Start by looking at the break in the earliest known evidence. If material identity changed before a system-wide color shift, investigate that boundary before treating a single cavity. If one cavity repeats a gate mark across stable material lots, then that evidence should be placed higher in the local list.
5. Treat the Mold, Hot Runner, and Cooling as a Cavity System

Direct answer: compare where a defect occurs and when it begins. Repeated single-cavity patterns call for a different investigation from a cavity-bank pattern, a start-up-only pattern, a lot-change onset, a slow drift, or a simultaneous system-wide change. In pet preform molding, the identity of individual cavity is more important than a pooled average when one local flow or heat-transfer path begins to move.
Geometrical symmetry doesn’t demonstrate balanced filling. In a peer-reviewed eight-cavity injection-molding study, filling imbalance was influenced by runner geometry, injection rate, melt temperature, and mold temperature, and wasn’t fully eliminated. Because this study wasn’t PET-preform-specific, it supports only the diagnostic principle: confirm actual balancing behavior rather than assume symmetry.
Editorial Asset: Cavity Signature Grid
The grid ranks evidence to collect. It isn’t a published defect fingerprint and must be tested against the actual mold and product.
| Observed pattern | First evidence to preserve | Mechanism families to test | Do not assume |
|---|---|---|---|
| Same cavity, repeated | Cavity sample, gate/neck zone, time and adjacent cavities | Local gate/nozzle, cooling, vent, surface or handling | The resin lot is innocent |
| Cavity bank or position band | Layout position, flow/cooling zone and weight map | Distribution, thermal zone, circuit or manifold pattern | Geometric balance proves process balance |
| Start-up then decay | First-shot sequence, stabilization history, retained samples | Thermal stabilization, material transition, purge/hold history | Steady samples represent start-up |
| Begins at lot/color change | Change timestamp, lot/additive identity, retained before/after sample | Material, contamination, purge or reheat response | “rPET” or color name is the cause |
| Gradual time drift | Trend, alarms, interventions, dryer/cooling evidence | Thermal drift, restriction, buildup, exposure or measurement drift | One late sample represents the run |
| All cavities change together | Common material, machine, cooling and timing events | Shared upstream or system-level change | Every cavity developed the same local fault |
Don’t erase the signature by pooling all cavities into one average. Mean weight or defect rate can look acceptable while one cavity is drifting. Keep cavity-level samples long enough to compare location, time, and intervention effects.
6. Diagnose Preform Defects Without a Universal Recipe
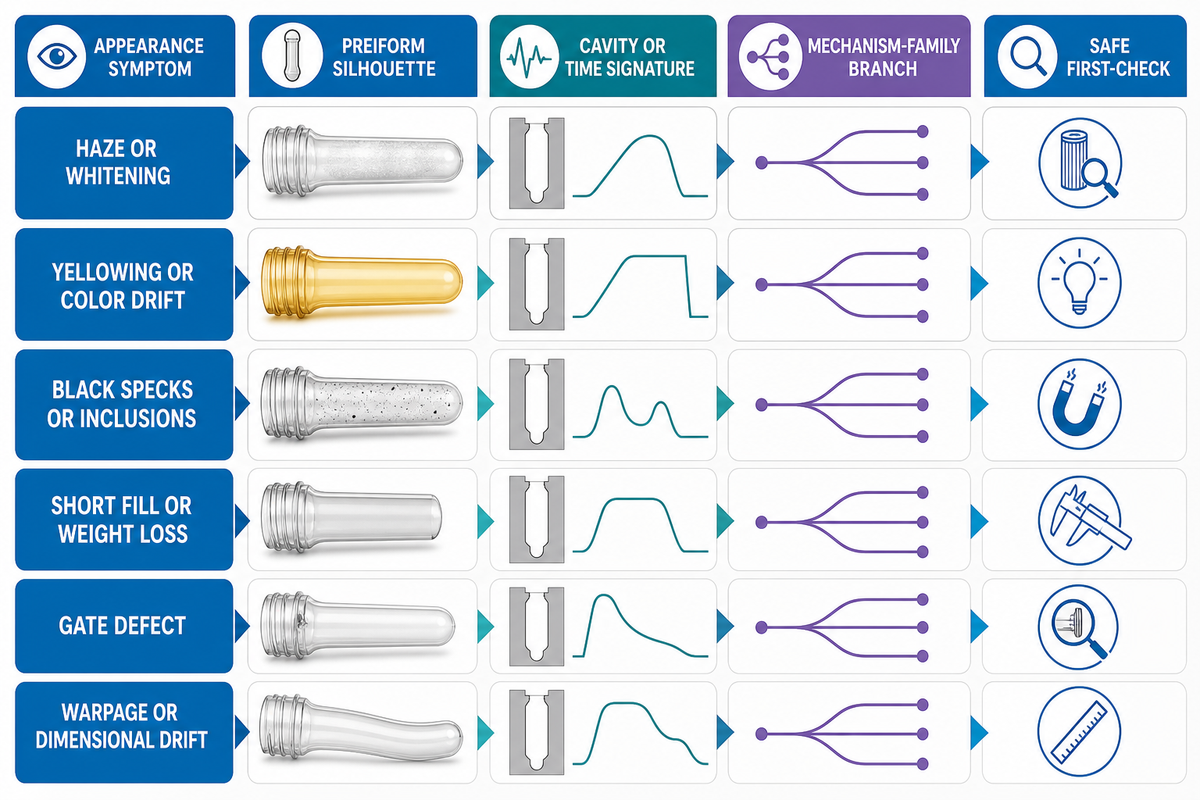
Direct answer: Name the symptom, map the location, describe the affected cavities, mark the start, relate them to material history and process history, then select the first safe verification that can separate mechanism families. A name for a defect isn’t a root cause.
| Symptom | Signature to inspect | Possible mechanism families | First safe check | Do not assume |
|---|---|---|---|---|
| Haze/whitening | Gate, body or neck; cavity/time spread | Material condition, thermal history, cooling/crystallization, downstream reheating | Compare retained samples and material/cooling history | Moisture is always the cause |
| Yellowing/color drift | System-wide or cavity-local; start-up or late-run | Material/additive identity, residence/thermal history, contamination, measurement/lighting | Verify identity and compare a controlled reference | Higher heat is the single explanation |
| Black specks/inclusions | Frequency, size, location, cavity and time trend | Incoming contamination, degraded residue, equipment/mold source, handling | Hold samples and trace the earliest common boundary | Appearance identifies the material |
| Short fill/weight loss | One cavity, bank, random, or all cavities | Feed/melt delivery, fill distribution, restriction, transition, measurement | Confirm measurement and compare the cavity/time map | Pressure should be raised first |
| Gate defect | Geometry, whitening, stringing, vestige, cracks; repeated cavity | Gate/valve action, local thermal/cooling state, ejection/handling | Preserve cavity samples and inspect the approved safe evidence | Every gate mark has one setting fix |
| Warpage/dimensional drift | Feature, cavity, cooling/handling position, measurement time | Packing, heat removal, ejection, post-mold stabilization, gauge method | Verify gauge/method and compare time from ejection | The mold dimension alone explains it |
In most cases, verification of the measurement should happen before a process change. Keep the “before” sample. Change one controlled factor only when authorized and safe. Repeat the same method for each consecutive sample. A better-looking next shot doesn’t prove root cause or long-run acceptance.
7. Separate Immediate Containment from Root-Cause Trials
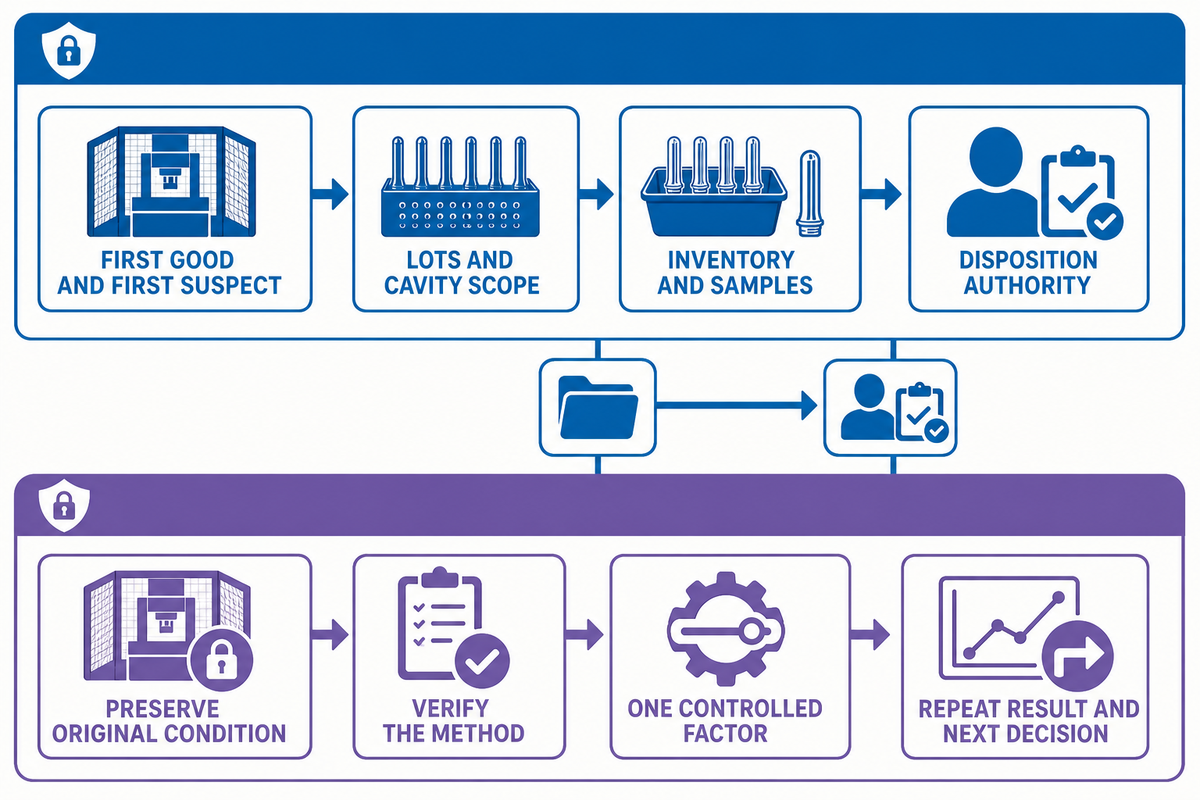
Direct answer: While product containment answers “what might be affected?”, an investigation answers “what evidence can separate causes?”. Keep the two lanes connected, but don’t release suspect product just because a trial sample looks improved.
Editorial Asset: Defect Containment Passport
Containment lane
- First known good and first suspect time
- Resin/preform lots and cavity scope
- Inventory, WIP, shipment, retained samples
- Hold location and disposition authority
Investigation lane
- Problem statement and verified method
- Original condition and change log
- One controlled factor and prediction
- Repeat result, bottle feedback, next decision
The most useful first trial doesn’t have to be the setting that requires the least effort or time to change. It’s the safe, approved comparison most likely to distinguish two plausible mechanism families while preserving the rest of the evidence. If material history and cavity point to different directions, a comparison should be chosen that holds one constant while changing the other.
Safety boundary: observations made during normal guarded operation aren’t permission to enter a safeguarded area, reach past a guard, defeat an interlock, or service hazardous energy. OSHA’s general machine-guarding rule requires protection from machine-area hazards in its US scope. The equipment manual, qualified personnel, site risk assessment, energy-control procedure, and applicable local rules govern the actual task.
8. Build a Preform Inspection and Traceability Routine
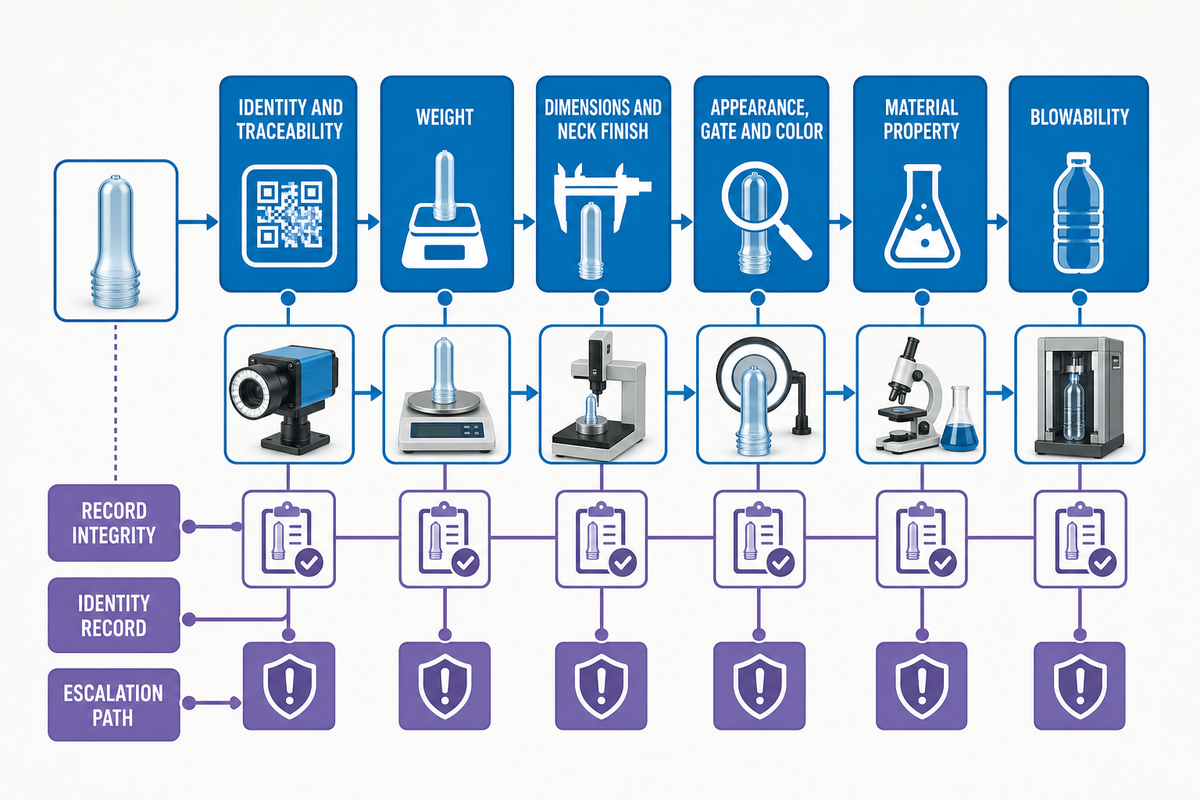
Direct answer: associate each release characteristic with a method, sampling trigger, identity field, acceptance criteria, deviation path, and a responsible approver. Preform quality may include weight, dimensional accuracy, wall thickness and material distribution, neck and gate geometry, appearance, color, contamination, named polymer tests, and bottle-trial evidence. Inspection proves the characteristic it measures; it doesn’t prove every unmeasured property, including acetaldehyde or intrinsic viscosity unless an appropriate named test was actually performed.
| Check family | Method definition | Sampling trigger | Minimum identity | Escalation |
|---|---|---|---|---|
| Identity/traceability | Label and system-record check | Receipt, start-up, lot/changeover, hold | Resin lot, product, mold, time/shot | Stop release if identity is broken |
| Weight | Calibrated method and defined conditioning time | Start-up, interval, intervention, trend alarm | Cavity and sample time | Hold affected scope and verify pattern |
| Dimensions/neck finish | Approved drawing, gauge and fixture | Start-up, change, maintenance, scheduled plan | Cavity, feature and drawing revision | Engineering/quality disposition |
| Appearance/gate/color | Lighting, viewing zones, references, instrument if specified | Continuous screen plus defined verification sample | Lot, cavity and image/sample record | Classify, contain, confirm by suitable method |
| Material property | Named laboratory method and units | Approved plan, change or investigation | Resin and preform lot, lab sample | Qualified material review |
| Blowability | Controlled bottle trial and final-container tests | Qualification, material/design change, investigation | Linked preform and bottle samples | Joint injection/blow/quality decision |
Proof boundary: Visual or automated screening may be considered a filter. Although a screening device may be highly accurate for the classes it was trained to detect, it can’t determine polymer chemistry, internal irregularities, food contact, and, of course, performance of a bottle. Therefore, retain access to laboratory analysis and a bottle trial when the release uncertainty extends beyond the validated scope of the screening device.
9. Prove Blowability at the Injection-to-Stretch-Blow Handoff
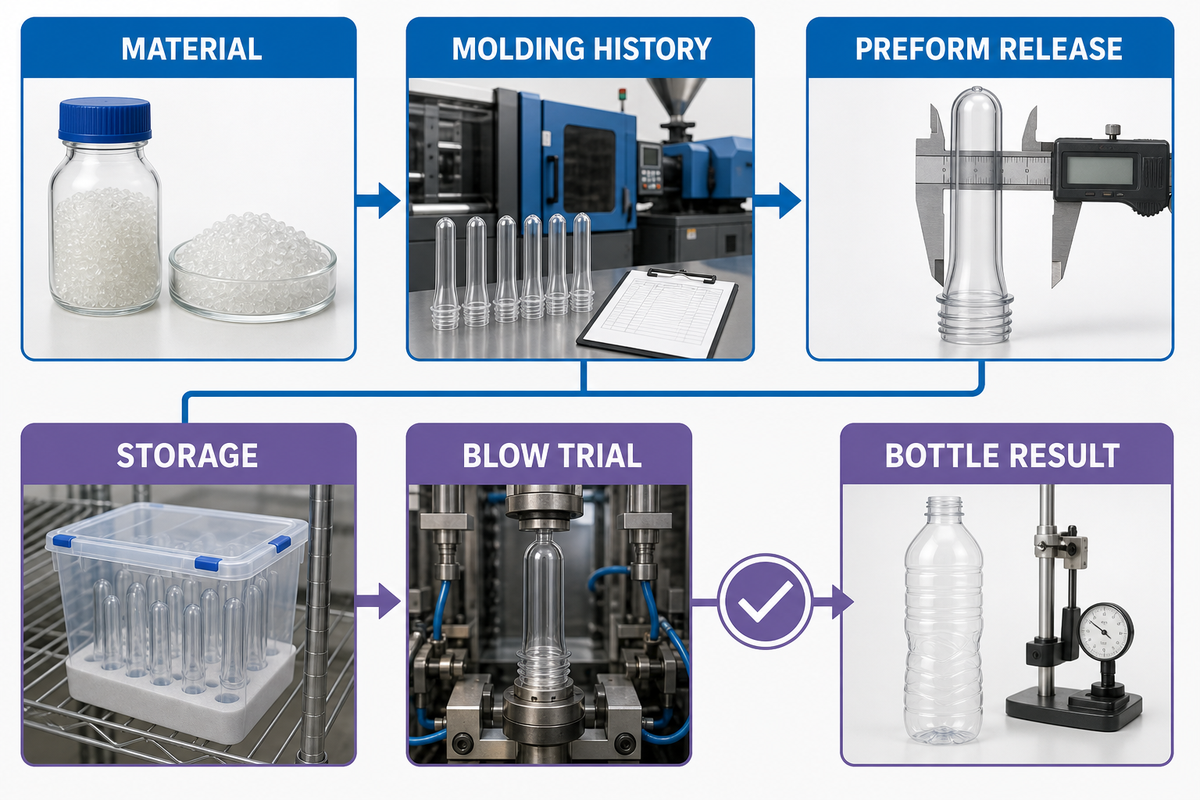
Direct answer: send more than a pallet label. A blowability handoff should entail representative preforms along with resin identity, cavity/time, storage history, inspection results, controlled reheating conditions, bottle-trial results, deviations, and final approval of the bottle.
A peer-reviewed study of stretch-blow heating demonstrates that preform temperature control belongs to the downstream process. It doesn’t create an injection release window in a blanket fashion. Reheating can be treated as a variable that wasn’t assessed by the injection-area appearance check. As a conservative release rule, not a conclusion from that study alone, appearance should be combined with the defined preform checks and a controlled bottle trial.
Editorial Asset: Blowability Release Packet
- Material: resin grade, lot, recycled-content route, color/additive identity, conditioning reference.
- Injection: product/drawing revision, mold, shot/time range, cavity samples, relevant alarms and interventions.
- Preform release: weight, critical dimensions, neck/gate, appearance, named material tests, deviations.
- Storage: packing, age, temperature/exposure controls where required, sample chain of custody.
- Blow trial: approved machine/tool, reheating-profile reference, stretch/blow settings under change control.
- Bottle result: defined final-container tests, failures by linked preform identity, decision and owner.
For rPET, include the material details that can affect reheating, not just a percentage label. A batch can meet an injection appearance check, yet respond differently to infrared heating, due to a change in the batch composition and history of the reheat additive. Conversely, a bottle-trial failure isn’t automatic proof that the recycled feedstock is at fault. Compare linked samples and controlled conditions.
Approval for blowability is specific to the product. It needs to indicate the bottle design, trial conditions, acceptance criteria, and permitted material/preform envelope. It doesn’t ensure food-contact compliance or approval in every market.
10. Keep Accepted Output Stable Through Changeovers and Long Runs
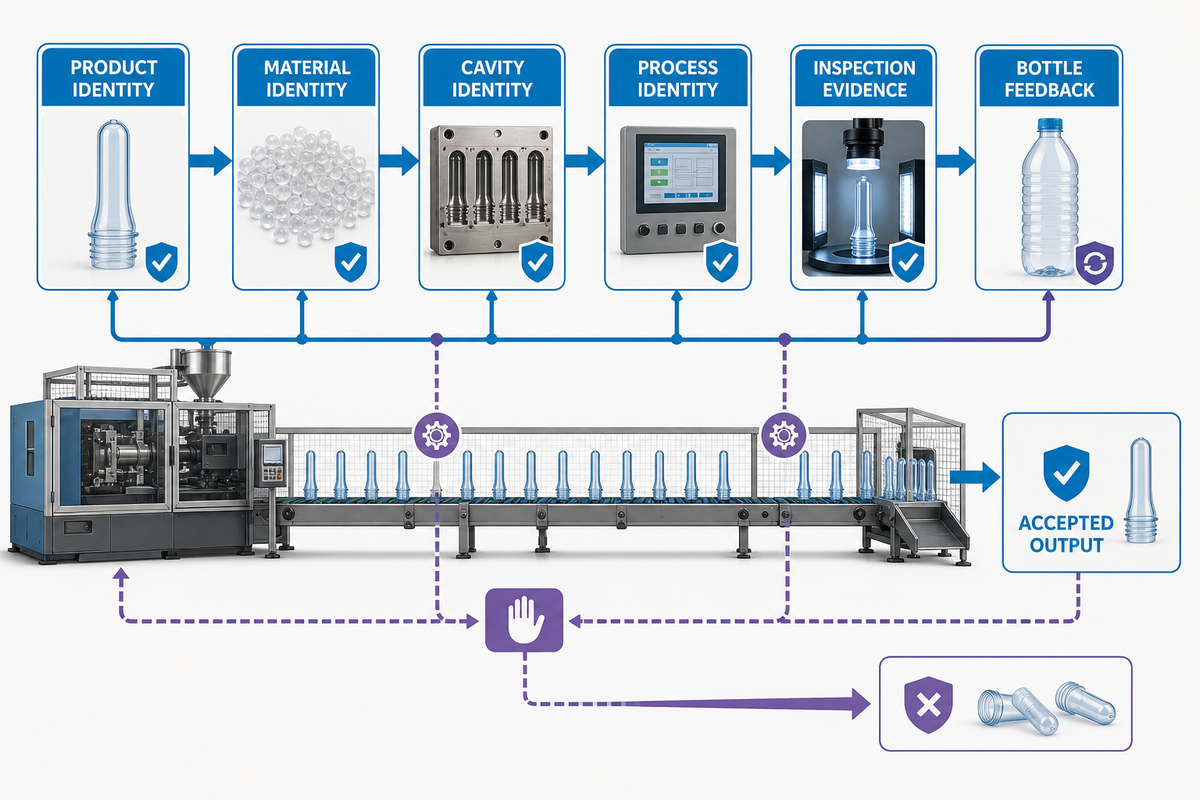
Direct answer: one approved sample shows that one sample passed. Sustained accepted output in PET preform production requires time-based evidence that keeps product, material, cavity, process, inspection, and downstream feedback identities connected. Accepted throughput should be tracked separately from gross cycles to prevent rejects being counted as capacity for bottle production.
Start-up
Record stabilization sequence, first approved sample, cavity coverage, and material transition.
Record stabilization sequence, first approved sample, cavity coverage, and material transition.
Steady run
Trend weight/dimensions/appearance, cavity signatures, alarms, dryer and cooling evidence.
Trend weight/dimensions/appearance, cavity signatures, alarms, dryer and cooling evidence.
Changeover
Bind resin, color, additive, mold, maintenance, purge and restart events to samples.
Bind resin, color, additive, mold, maintenance, purge and restart events to samples.
Intervention
Preserve before/after data, authorized change, prediction, retest and disposition.
Preserve before/after data, authorized change, prediction, retest and disposition.
Downstream
Return bottle failures and accepted trials to the original preform and process record.
Return bottle failures and accepted trials to the original preform and process record.
Review
Ask whether the accepted envelope still matches product, method, material and market use.
Ask whether the accepted envelope still matches product, method, material and market use.
Current EU packaging rules add a lifecycle and recycled-content documentation context, but they don’t define a PET injection setting. The European Commission states that Regulation (EU) 2025/40 applies from 12 August 2026; its application depends on the packaging and market. Keep regulatory identity, material capability, molding quality, and bottle performance as individual review criteria.
This long-run record is an editorial control aid, not a statistical-control standard. Plants should set sampling frequency, control rules, alarms, and response plans from their validated process and quality system. When the process duty has been formally defined and the next decision is the arrangement of equipment, Mass Technology can be assessed under its pet preform injection solution.
Frequently Asked Questions
How are PET preforms made?
PET preforms are made by confirming and conditioning the approved resin, plasticizing it in an injection unit, filling and packing a multi-cavity mold, cooling the parts, ejecting and stabilizing them, and inspecting them against a controlled specification. This stage of the injection moulding process produces an intermediate rather than a finished bottle. The identity and release evidence should be kept connected to subsequent reheating and stretch-blow results. Release follows after the linked inspection and downstream evidence meet the defined plan.
Why must PET resin be dried before injection molding?
PET can absorb moisture, and moisture present during melt processing can contribute to hydrolytic chain degradation. Drying should follow the actual resin supplier’s instructions and the qualified site process. Record the grade, exposure history, dryer condition, residence, transfer path, sampling point, test method, result, and disposition. Simply copying a time or temperature controlled drying record from other resins or plants is inadequate. Keep that evidence linked to the resin lot, transfer path, and later melt-quality observations.
What should a PET preform inspection include?
Begin with the approved drawing and product specification. Check identity, weight, critical dimensions, neck finish, gate condition, appearance, color, contamination, named material tests, cavity pattern, and blow-trial status. Define the method, sample trigger, lot/cavity identity, acceptance source, deviation path, and responsible approver.
Why can a visually acceptable preform still blow poorly?
A basic appearance check may not reveal material, dimensional, storage, temperature-distribution, or cavity-related variation that becomes important during reheating and stretching. Link samples to resin lot, cavity, time, inspection, and storage. Then run the approved bottle trial against defined heating and final-container tests. Record failures against the same sample identity. Injection acceptance and blowability approval answer different questions. One checks a preform specification; the other tests bottle performance under defined trial conditions.
What causes whitening, haze, or crystallization in a PET preform?
Appearance can have several causes. Those appearance labels can arise from more than one mechanism, including material condition and thermal or cooling history. Record where the symptom sits on the preform, which cavities show it, when it began, the resin/additive lot, and the process events. Then choose an appropriate safe and controlled comparison. Appearance by itself shouldn’t be considered proof of moisture or a single setting error.
What is the difference between preform injection and bottle blow molding?
Preform injection produces the intermediate and finished neck. Stretch blow molding reheats and stretches that accepted preform into a bottle. Controls differ, but product history crosses both operations. Handover records link resin, cavity, inspection, storage, trial conditions, and final-container results.
Release Evidence First, Then Discuss Equipment
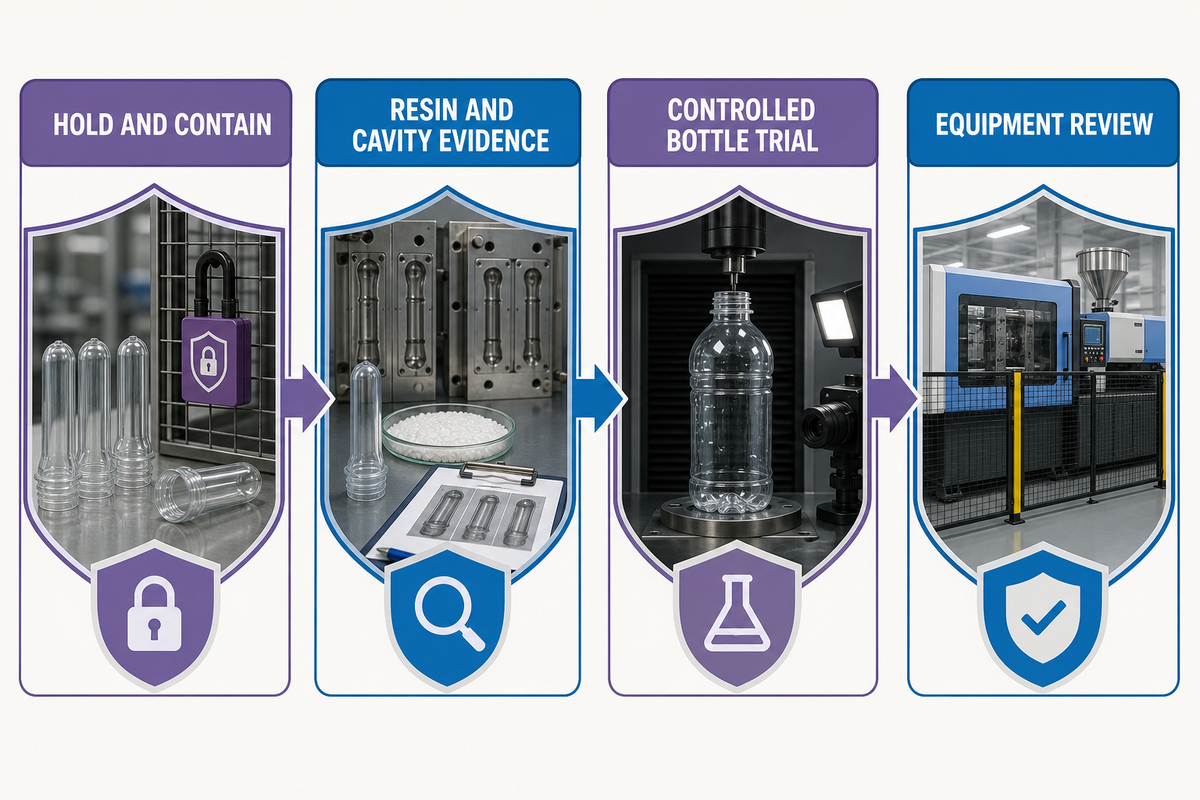
Hold and contain when the identity of the product or the affected scope is unclear. Evaluate resin and cavity evidence prior to widespread alterations. Require a controlled bottle trial when downstream performance remains open. Once the duty, proof methods, and handover are defined, the equipment discussion becomes more precise.
Bring a defined process duty to the equipment review
Share the resin, preform, mold, release, and downstream requirements that the project must support. Mass Technology’s company background provides the manufacturing and technical services context.
References & Sources
- ASTM D4603-26, Standard Test Method for Determining Inherent viscosity of PET
- Thermal and Mechanical Properties of Recycled and Virgin PET
- 2025 PET preform parameter study using Taguchi method and ANOVA
- Filling imbalance in geometrically balanced Multi-cavity injection molds
- Temperature control in the PET stretch-blow heating system
- PET bottle-to-bottle recycling for the beverage industry: review
- US FDA, Recycled Plastics in Food Packaging
- OSHA 1910.212, General Requirements for All Machines
- European Commission, Packaging Waste and PPWR
- US6171541B1, Preform post-mold cooling method and apparatus